About Me

New Hartford, Connecticut, United States
Name: Todd Russo Location: New Hartford, CT, USA

Sunday, January 29, 2012

Updates and the motor comes home!

With my busy week this week, I had no time to write any updates. I have many so bear with the chaos.
First, the radiator was re-cored and finished. The price for it was about the same as a new radiator so on that aspect it is comparing apples and oranges.

I will need to get a new blanking cap for the radiator. As I was starting to clean up the old cap, the rubber literally crumbled and there was too much rust on the metal. I found a place in Britain that had them so I ordered two just to be safe.

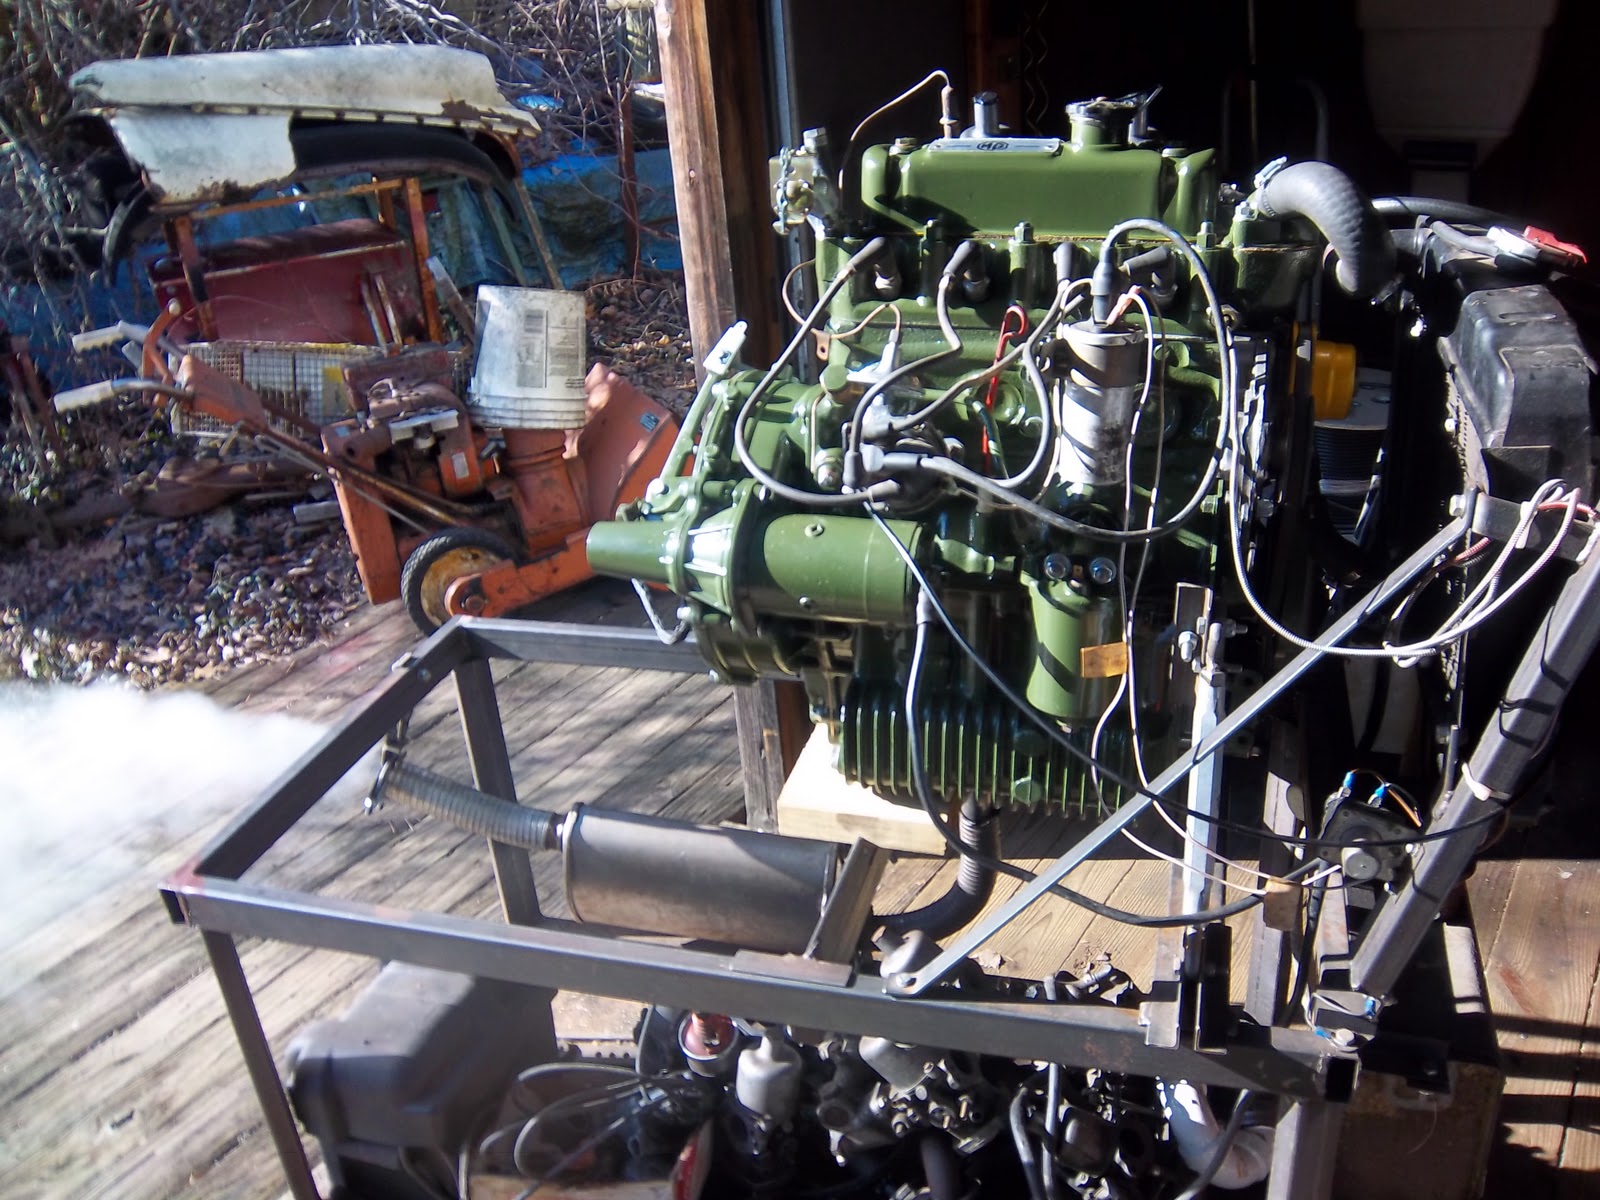
And, now for the big news…the motor is home!! We went down to pick it up today before the weather deteriorates this week. Here is the front side…

…and the back side/left side 3/4 shot.

Here is Chris Crees, the craftsman who rebuilt it. A long tedious process, but I know it was done right!

I could not help myself from installing the water pump pulley and fan.

And the air filter manifold.

Also, John managed to help me get the right side drive shaft out through the hub. He also gave me some advice on getting the flange and brake rotor to seat properly.

I have to get going and do some work on Old Biddy because the center of our garage is all filled up with big things!!

This week I will keep assembling to finish up the front sub-frame unit. Work may slow me down a bit but updates should come much quicker now that everything is home under one roof.
Thanks for visiting.
Toddy

Monday, January 23, 2012

The smooth and bumpy front suspension adventure

The suspension installation was moving along without problems. It was nice to have all the parts completely restored before assembly. All my previous hard work for the past five years is finally paying off!
I attempted to install the drive shafts so the brake dust cover, hub flange and brake rotor could be installed. I had to figure which shaft went on which side as one is shorter than the other. Once I got that sorted out, (the driver (left) side gets the short shaft) everything else was prepared.  

I attached the flange to the brake rotor making sure to “Anti-seize” the mating surfaces. Four years ago when I was disassembling, a rotor rusted solid to the flange on one side and I ended up ruining that flange trying to break them apart.

Then the brake dust cover was loosely installed. It will not be tightened in place until the calipers are installed. Everything else was slid on and tightened into position. Here is the almost finished driver’s side. Only thing missing is the brake caliper which has to be assembled and then everything gets torqued in and greased up.

The other side did not go as smooth. First, the flange would not seat level on the brake rotor.

And second, the drive shaft did not want to fit through the hub and I could not figure out the reason. I decided to stop for the night before something went wrong.

Radiator update: yes, as I thought, I will need to have a new core!! I should have it back by Wednesday or Thursday. I also forgot to order a couple parts along the way. I need both universal joints and corresponding u bolts. Nothing major just one more thing to do…
Thanks for visiting.
Toddy

Friday, January 20, 2012

Ending the front suspension suspense.

The objective this week was to rebuild the front suspension components back onto the sub-frame. When ADO16s were built in Abingdon, this was the way they were originally assembled.
After months of anticipation, the first parts to be installed were the driver’s (left hand) side upper control arm and hydraulic cup.

Making sure to properly lubricate each piece and “Anti-seizing” the threads will help prevent the problems that plagued these parts before.

The lower support arm and the hub came next. I made sure to tighten but not torque these in place since everything will have to be adjusted and aligned later.

And just for kicks, the bump stops were installed in the wheel wells.

I also took the radiator to the radiator shop to have it cleaned and checked out. My guess (since everything else on this car has needed a total overhaul) is that it will probably need a new core.

The radiator cap needs to be cleaned and repainted, too (but this is minor).

Assembling is fun!! Not bad for only three hours work.
Thanks for visiting.
Toddy

Monday, January 16, 2012

Steering rack and motor start.

I have been looking forward to getting to this point in the restoration process for a long time. I cannot believe that it is actually here. With the sub-frame dropped, we can start to install the rebuilt and restored parts that have been sitting in my cellar in boxes, shelves and drawers (in some cases for five years!) onto Old Biddy. Finding spare time will now be the only thing slowing the process down.
The first thing that I wanted to install was the refurbished steering rack.

The sub-frame was in the way of installing it here.

Lined it up, bolted it in, and after seven minutes…just like that…there it is, installed in its proper place! Presto! It is almost magical!

Sunday John and I took a ride down to Chris’s to see the motor run on his test stand. Without hesitation, it cranked right over. He gerri-rigged a coil, distributor cap and wires, and a few other things to get it started. But she ran beautifully smooth! Check out the exhaust cloud coming out of the muffler.

The jets in the carburetors now are the ones used in MG Midgets and Austin Healey Sprites. In this application, they make the carburetors run too lean. Chris will order the proper needles and then change them.

It was a toasty 15 degrees Fahrenheit outside, but watching and listening to the motor warmed me up inside! I hope to have the motor home within the next week and a half. After that, it will be just a matter of methodical systematic progress.

Thanks for visiting.
Toddy

Saturday, January 14, 2012

Raising the car (second attempt)

Friday afternoon John had a few moments to come over again to help remove the front sub-frame. We moved the car to give us space, attached the bracket, attached the crane, and attached the chain to the now modified angle iron bracket.

Once everything was reset, I started to slowly pump up the crane.

The bracket twisted a little bit but the car lifted up as planned!


The sub-frame dropped right out without any problems at all. We slid it out from underneath the car and set it temporarily on a dollie.


After we cleaned up and moved the car back in place, I could not help myself from taking a picture of the empty engine bay. I have been waiting for this for three months and it only took half an hour to do!

I talked to Chris on Thursday night. With everything all rebuilt (including the carburetors), he started and ran the motor for the first time!! I will be going down on Sunday (tomorrow) to witness it for myself. I hope to have the motor back home within the next two weeks.
I am ecstatic!!
Thanks for visiting.
Toddy

Thursday, January 12, 2012

Raising the car (first attempt)

Last week John had a few moments to come over to help remove the front sub-frame. We moved the car to give us space, assembled the crane, and attached the chain to the angle iron bracket. As we slowly started to raise the car, the laws of physics kicked in.

The angle iron bracket started to twist since it was only attached with one bolt. It popped out of position. With no way to secure it further, we decided to drop the car and remove the crane. We measured for a new hole on the other side of the existing bracket bolt. The bracket was taken up to John’s for further modification. And finally, a week later, I got a chance to get up to his house and use his drill press for the first hole.

And then, John insisted on a second hole for the chain link lifting hook to secure it in place.

One step forward, one step back. Boom chicka boom chick.
Thanks for visiting.
Toddy